Mac Operations
Adobe Creative Cloud Deployment - Pushing Installers with Munki
We previously covered a few aspects of Adobe Creative Cloud from the perspective of deploying it to OS X clients. We spent the whole time dealing with the licensing aspects but never talked about the actual installers and updates.
Adobe installers are spoiled
There is a single option available to you for getting the installers: you must use the Adobe Creative Cloud Packager application (CCP for short) to fetch and build OS X installer packages. Because Adobe has reinvented the wheel and opted to use their own custom installer framework, the installer packages that CCP outputs do not use any of OS X’s native installer features - instead the packages simply provide just enough of a mechanism to bundle up Adobe’s own installer tooling (which have actually grown substantially in size in proportion to the actual applications they install) and run them as “preinstall” scripts.
The advantage of having the installers in an installer package format is that they can be deployed using the multitude of tools which can install packages: the OS X GUI, the installer command, Remote Desktop, DeployStudio, and management platforms such as Munki. The disadvantages of this wolf-in-sheep’s clothing packaging system are numerous, but this is the only option we have to deploy Adobe applications efficiently.
Adobe support in Munki
Luckily, Greg Neagle, author of Munki, has done us the service of providing great support in Munki for these spoiled application installers - because historically these packages have needed “help” installing in different contexts. After CCP builds a new package, it outputs both an installer and uninstaller package to our output directory, and we import these packages like any other using munkiimport.
I was going to go into more detail on this whole process, but Nick McSpadden has already done just that in an Adobe CC guide on the Munki Wiki.
This boils down to using Munki’s admin tools to import the base installer package, and then using aamporter to automatically fetch and import all the applicable updates. Nick also details some of the less-standard applications that need some more massaging once in the repository.
Because the process (which creates compressed disk images from the CCP bundle-style packages) is lengthy and you may have many packages to do, I wrote a very simple helper Python script that helps batch these initial imports. Nick has covered this in the wiki article as well, but for reference it’s here.
As far as updates go, one way in which Munki beats all other software management platforms is that it can apply Adobe’s “patch updates” natively without any repackaging necessary. Adobe has for a long time offered the ability to generate packages from their updates, but that requires not only manual work to build them, but a lot of manual bookkeeping to keep track of them. aamporter has been able to leverage this support by grabbing the updates directly from the in-application updater mechanisms and importing these items directly. This also makes it possible to keep CCP installer packages “simple” but omitting the optional updates, and minimizing the need to interact with CCP.
Creative Cloud Desktop app
If you opt to deploy Named licenses, one important thing that distinguishes those installers from device- or serial-number-licensed packages is that when you build the package from CCP, the Creative Cloud Desktop Application (or CCDA) cannot be deselected from the package configuration. With device- or serial-number-licensed packages it can be omitted, with Named licenses it cannot. The “Applications & Updates via the Apps Panel” can be, which might be useful to disable if your users do not have administrative rights or you’d prefer they install apps via your own in-house systems.
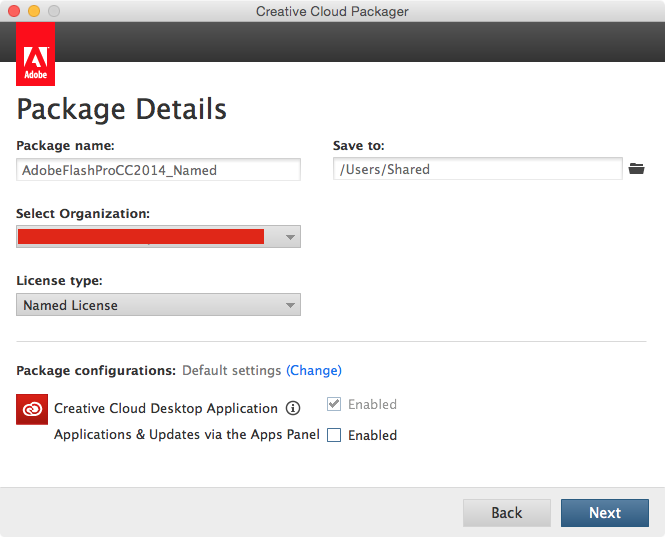
CCDA cannot be disabled with Named Licenses, although the 'updates via the Apps Panel' can be.
Alongside the CCDA, the installer package output by CCP will include a LaunchAgent that opens it at login for all users. Users will see it in the menu bar and by default it will show a big login window prompt when it’s first opened.
This is by design, because Named licenses include “cloud services” like storage and collaboration tools. However, if you are just deploying device licenses on top of Named installers (as I covered earlier and don’t have license agreements that include these features (or your users have no use for them, or are using them in labs), you may want to ensure that this application doesn’t constantly pop up.
This LaunchAgent is located at /Library/LaunchAgents/com.adobe.AdobeCreativeCloud.plist, and so you may wish to remove this in a postinstall script or via some other mechanism. If you have many Named installers, just be aware that the installation of each Named installer will put this LaunchAgent back. I’ve opted to run a script that removes this plist on every machine boot (using a system like outset), a script that I’ve installed as an update for my device license package (built using the method described in this earlier post. Since I intend to keep the Named installers useful for users who actually have Named licenses and could potentially use the features offered via the CDDA, I did not want to automatically remove the LaunchAgent for any installation, only those for which I’ve installed a device license activation.
Because this is a LaunchAgent and not a LaunchDaemon we cannot simply run launchctl unload -w to disable it system-wide - it would need to be disabled and overridden per user. So, if you intend to remove this LaunchAgent to prevent it from auto-launching, more drastic measures are required.
Wrapping up
Are we done here? This is about as much information as I’ve needed to absorb in this process of getting our CC deployment prepared. I have some general thoughts about this whole process that may show up in a later post, and hopefully there aren’t any other major issues that crop up with the approaches I’ve outlined in the previous posts in this series.
comments powered by Disqus