Mac Operations
Apple Silicon macOS Virtual Machines in Monterey's Virtualization Framework
Note: Since this article was originally published, there have been exciting new developments. Check out the follow-up article from June 2022 here.
When Apple released the first macOS 12 Monterey betas in June 2021, some interesting new APIs were added to the Virtualization framework developer docs. Here’s the new APIs below (at time of writing, where Monterey’s latest version is beta 10). In particular, notice the VZMac* APIs:
VZAudioDeviceConfiguration
VZAudioInputStreamSource
VZAudioOutputStreamSink
VZDirectoryShare
VZDirectorySharingDevice
VZDirectorySharingDeviceConfiguration
VZGenericPlatformConfiguration
VZGraphicsDeviceConfiguration
VZHostAudioInputStreamSource
VZHostAudioOutputStreamSink
VZKeyboardConfiguration
VZMacAuxiliaryStorage
VZMacGraphicsDeviceConfiguration
VZMacGraphicsDisplayConfiguration
VZMacHardwareModel
VZMacMachineIdentifier
VZMacOSBootLoader
VZMacOSConfigurationRequirements
VZMacOSInstaller
VZMacOSRestoreImage
VZMacPlatformConfiguration
VZMultipleDirectoryShare
VZNetworkDevice
VZPlatformConfiguration
VZPointingDeviceConfiguration
VZSharedDirectory
VZSingleDirectoryShare
VZUSBKeyboardConfiguration
VZUSBScreenCoordinatePointingDeviceConfiguration
VZVirtioFileSystemDevice
VZVirtioFileSystemDeviceConfiguration
VZVirtioSoundDeviceConfiguration
VZVirtioSoundDeviceInputStreamConfiguration
VZVirtioSoundDeviceOutputStreamConfiguration
VZVirtioSoundDeviceStreamConfiguration
VZVirtualMachineView
What’s interesting here is that (I think) it’s the first time we see native Apple APIs for macOS guest virtual machines.
Virtualizing on Apple Silicon
Because Apple Silicon hardware has such great performance at a low thermal cost, and Apple hardware is the only legal platform on which (as a user) to run macOS, and macOS is the only officially-supported platform for building and releasing apps for Apple hardware platforms, I’m very interested in being able to continue to virtualize macOS as we transition away from Intel-based Apple hardware.
Where can we see some of these new Virtualization framework features already implemented? There are several open-source experiments you’ll find on GitHub:
- https://github.com/KhaosT/MacVM
- https://github.com/ming900518/macOS-Virtual-Machine
- https://github.com/jspahrsummers/Microverse
- https://github.com/zhuowei/VirtualizationDemo
I’m aware of only one commercial offering that uses these new APIs, and that is Parallels Desktop 17. So, I just started using Parallels to experiment with what was possible at this early stage (and to just take the easiest path to seeing this for my own eyes). Parallels offers a 14-day trial of the Parallels Desktop product. This KB article from Parallels also covers macOS Monterey guest support on Apple Silicon in more detail.
The other repos I listed above are also easy enough to get started with, just that the setup steps vary slightly and also require you to build the projects from source (which still requires Xcode 13 betas, since only these include the macOS 12 platform SDK). Any of this experimentation requires running macOS Monterey betas as the host OS.
Basics
The Parallels UI presents a straightforward path to getting a Mac VM created when running on an M1.
Once you’ve created a VM, what’s interesting is that it will immediately show download progress:
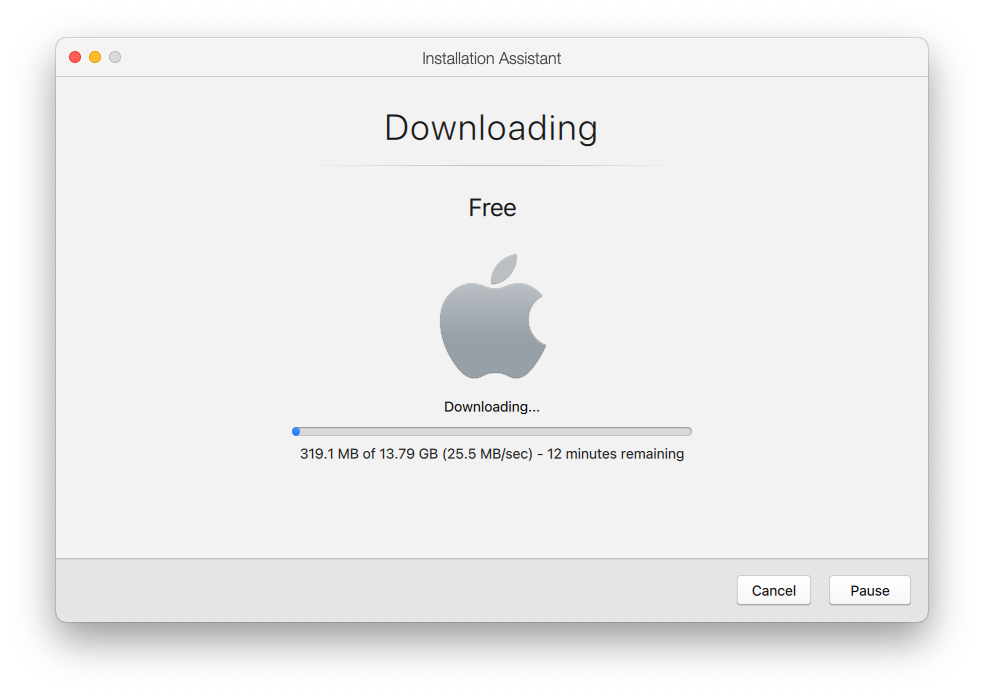
Automatic IPSW discovery courtesy of VZMacOSRestoreImage.fetchLatestSupportedWithCompletionHandler
While Apple has been making it easier in recent years to retrieve macOS installers, commercial VM solutions always required you to supply your own installers, which they would then (always via a lengthy Bash script) quietly mount in the background, converting its various pieces into a new disk image layout that was suitable for installation. It was a constant moving target, changing subtly with seemingly ever OS release since OS X Lion.
This new system seems to abstract nearly all of this away…
A brief detour on IPSWs
When Apple Silicon devices first appeared, it seemed uncanny (and also not terribly surprising) that such a device would be restored by putting them into DFU mode and restoring .ipsw files using Apple Configurator, in the same way one restores an iOS device. The .ipsw file is just a zip file, however, and so they can contain whatever the hardware/firmware platform is expecting. Want the 1st generation iPod firmware from around 2001? You can still download it from Apple (it’s 2MB and contains only 2 files: a manifest and the firmware binary):
$ curl -sLO http://appldnld.apple.com.edgesuite.net/content.info.apple.com/iPod/SBML/osx/bundles/061-2686.20060912.ipTsW/iPod_1.1.5.ipsw

$ ls -lh iPod_1.1.5.ipsw
-rw-r--r--  1 tim  wheel   2.0M  7 Oct 22:26 iPod_1.1.5.ipsw

$ unzip iPod_1.1.5.ipsw
Archive:  iPod_1.1.5.ipsw
  inflating: Firmware-1.1.5
  inflating: manifest.plist

$ hexdump -C Firmware-1.1.5 | head -n 10
00000000  7b 7b 7e 7e 20 20 2f 2d  2d 2d 2d 2d 5c 20 20 20  |{{~~  /-----\   |
00000010  7b 7b 7e 7e 20 2f 20 20  20 20 20 20 20 5c 20 20  |{{~~ /       \  |
00000020  7b 7b 7e 7e 7c 20 20 20  20 20 20 20 20 20 7c 20  |{{~~|         | |
00000030  7b 7b 7e 7e 7c 20 53 20  54 20 4f 20 50 20 7c 20  |{{~~| S T O P | |
00000040  7b 7b 7e 7e 7c 20 20 20  20 20 20 20 20 20 7c 20  |{{~~|         | |
00000050  7b 7b 7e 7e 20 5c 20 20  20 20 20 20 20 2f 20 20  |{{~~ \       /  |
00000060  7b 7b 7e 7e 20 20 5c 2d  2d 2d 2d 2d 2f 20 20 20  |{{~~  \-----/   |
00000070  43 6f 70 79 72 69 67 68  74 28 43 29 20 32 30 30  |Copyright(C) 200|
00000080  31 20 41 70 70 6c 65 20  43 6f 6d 70 75 74 65 72  |1 Apple Computer|
00000090  2c 20 49 6e 63 2e 2d 2d  2d 2d 2d 2d 2d 2d 2d 2d  |, Inc.----------|
There are multiple sites that index (and scripts that will pull) available .ipsw files. The Mr. Macintosh blog keeps a nice list of the non-device-specific macOS .ipsw files for both release and beta OS versions hosted by Apple, which is handy when you also want to correlate Apple’s “beta” version with a build number and date. You can also get beta .ipsw files yourself directly from Apple with a developer program membership.
usbmuxd somewhere I never thought I’d see it
Of the APIs listed at the top of this page, some will be used to point the virtual machine to a local .ipsw file, or even to ask the framework where it can fetch the latest one. Parallels wraps this functionality in one of the CLI tools used behind the scenes, which you can simply call yourself with the --getipswurl option to output the URL:
# returns the beta 10 ipsw as of Oct 13
$ '/Applications/Parallels Desktop.app/Contents/MacOS/prl_macvm_create' --getipswurl
https://updates.cdn-apple.com/2021SummerSeed/fullrestores/002-17770/4A6911AE-3A4E-47BA-8104-1A3CF596E0C6/UniversalMac_12.0_21A5552a_Restore.ipsw
This prl_macvm_create tool within Parallels is not documented or likely ever expected to be run directly by users, so its behaviour is not well-defined.
Side-node: future Parallels updates would likely add more parameters to this utility. Apple’s Virtualization APIs provide a way to define the “machine model” and this includes OS version constraints. Because all of this functionality requires macOS Monterey, we yet don’t have a significant span of macOS versions with which to see how this should work going forward.
When the download completes, the GUI will show an “Extracting” phase, which seemed mostly to be the Virtualization framework performing the actual restore/installation operation. If you pay close attention to the processes running on the system at this point, and have ever done work with connected iOS devices (e.g. development in Xcode or device provisioning with Apple Configurator) you will likely see the familiar usbmuxd!
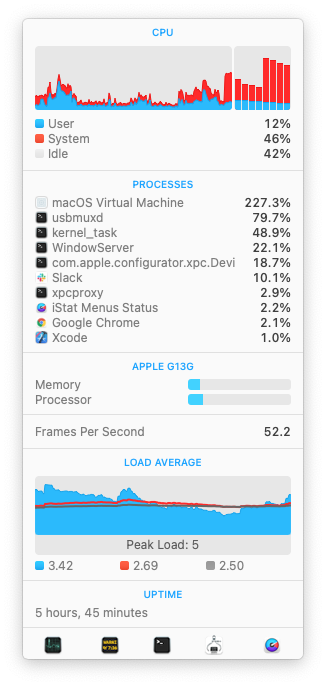
Both the VM process and usbmuxd doing the work of restoring the VM
So, just as in 2021 it is now commonplace to put a Mac (usually with repeated efforts) into DFU mode and then flash it using a connected USB cable, we now do the same thing to restore a bare VM, which behind the scenes uses the Virtualization framework’s specially-emulated USB device mimicking a physically-connected Apple Silicon machine (or something close enough to it).
Initial observations
I plan on writing more posts as I spend more time learning about how this framework and its surrounding infrastructure works, but I have a few observations to include here right away:
Speedy VMs
These VMs are fast. Once the OS has been installed, and I click the “Start” button in the Parallels UI, the VM is at the login screen in 7 seconds.
They’re also fully Metal-accelerated:
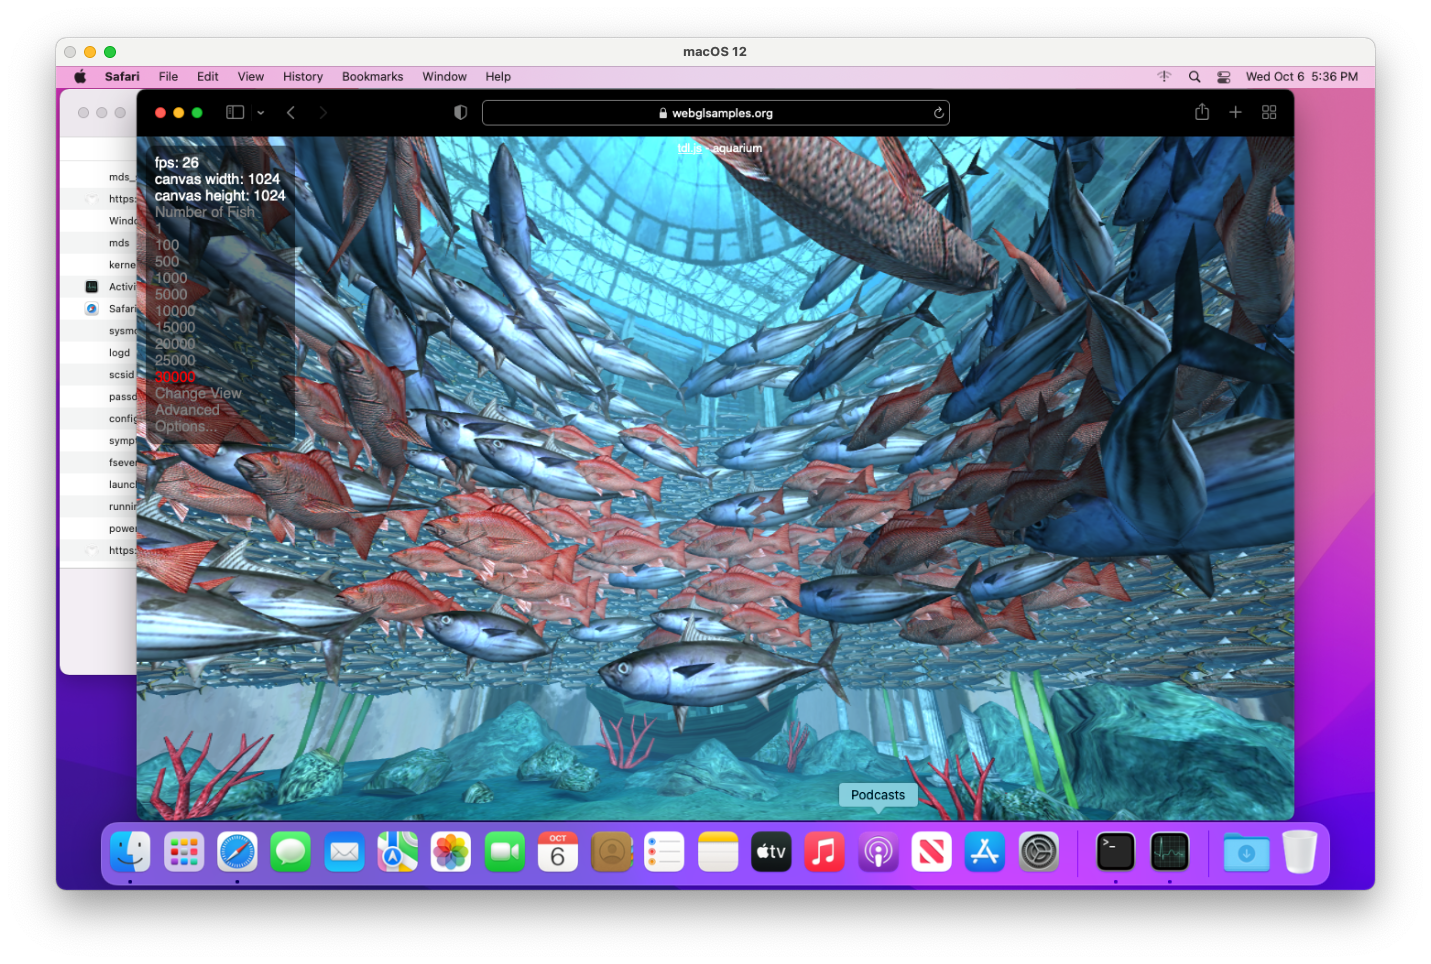
26fps for 30k fish in the Aquarium WebGL sample
Here are Geekbench 5 benchmark results that I took:
# Physical Mac Mini M1
# https://browser.geekbench.com/v5/cpu/10276653
Single-core score: 1745
Multi-core score: 7613

# VM configured with 8 cores and 16GB memory
# https://browser.geekbench.com/v5/cpu/10303746
Single-core score: 1733
Multi-core score: 7437
The benchmark scores are effectively no different between the host OS and that of a VM. One thing to note in the above is that I didn’t figure out any way to configure a Parallels Mac VM on Apple Silicon with anything other than a 4-core CPU and 4GB RAM, so I used the macOS Virtual Machine project linked above to set up the VM for these benchmarks.
VMs are a thin implementation
In what is I think somewhat similar to products that implement Apple’s Hypervisor framework (first introduced in 2014), there’s not much to differentiate the performance or “platform functionality” of a macOS VM running on Apple Silicon with the Virtualization framework. Up until recently, products like VMware, Parallels or VirtualBox would be competing on the quality and performance of a proprietary hypervisor implementation, and would also ship their own bootloader implementations to enable other features specific to Apple hardware.
This to say that one can build and run these various experiment projects I linked above and subtitute them in for the Parallels VM I started with in this article, and at least with the most minimal machine and storage configuration, expect them to perform the same. The Parallels implementation here is really a completely separate app that offers a GUI frontend to a couple basic command-line tools that are able to set up the VMs and register them with their main management interface. In Parallels’s UI, the familiar “settings” interface available for other OS types is nowhere to be found for a macOS VM.
EULA enforced by the framework
Big Sur’s release was right around the time that AWS also announced general availability of their Mac EC2 offering. And so, Apple’s license agreement for Big Sur was updated slightly to acknowledge the existence of colocated Mac hosting providers, who also make it possible to “rent” access to both virtualized and “bare metal” macOS installations running on Apple hardware. Brian Stucki, founder of Macminicolo, wrote up his take on this here.
There’s one aspect of the agreement that didn’t change, however, which is the restriction on being able to run no more than 2 VMs at the same time, in addition to the OS that’s already running on the host.
Technically, there was nothing restricting software from running more macOS VMs concurrently, except I believe at least one commercial vendor in recent years began enforcing this limit. But what’s now possible, with the Virtualization framework having a dedicated code path to officially-supported macOS guest VMs, is that the framework itself disallows running above this limit of 2 simultaneously-booted VMs, leading to this error if we try to restore/install a third VM while two others are already booted:
2021-10-13 19:44:54.275 prl_macvm_create[15911:96430] A software update is required
to complete this installation. The maximum supported number of active virtual machines
has been reached.
Differences from Intel-era macOS VM
We can talk here a bit about how these VMs are different from what we’ve had up to now in terms of support for macOS guests on Intel-based hypervisors. The main theme present through a number of these details is that these VMs make heavy use of paravirtualization out of the box via VirtIO drivers, whereas (I think) the non-Apple hypervisor implementations we’ve seen in the past were fully-virtualized PC VMs which could then be “empowered” with additional capabilities by guest OS drivers and custom bootloaders. QEMU on Intel was able to do a bit of both in this regard: see also the QEMU Footnotes section at the bottom.
GPU acceleration
One longstanding issue with running macOS as a VM was the lack of GPU acceleration. This made for a sluggish user experience in the Finder that was also filled with graphics glitches.
It also made certain things perform very differently than on a physical Mac, and other things impossible, which were especially problematic if a VM was being used as a test environment. Xcode’s Simulator app uses Metal to render as of macOS Catalina, for example, and so would render visually differently if using software-only rendering – subtly different, but enough so as to break any automated tests relying on image snapshots. Many applications using AVFoundation APIs to perform video playback simply wouldn’t work at all. This has been problematic with Safari when running automated tests using WebDriver against many websites that display streaming video content.
With macOS Big Sur all but killing support for 3rd-party kernel extensions, and virtualization products on macOS being required to use the Hypervisor framework, we recently began to see vendors (like VMware and Veertu/Anka) adopting support for Metal GPU acceleration within macOS guests, which I think largely solved the problems listed above. Doing GPU passthrough from a host into a VM has been an option (even on non-Apple hardware), but it’s nontrivial and comes with hard limitations: there are various fora online devoted purely to GPU passthrough in QEMU/KVM.
Snapshots
I’m not aware of any functionality within the Virtualization framework to support taking “full” machine snapshots, in which all of the machine configuration, peripherals and disk states (and optionally the memory, if the VM is running) are all captured.
However, I believe the most saught-after feature of snapshots is simply having the various “layers” of disk data available in non-booted snapshots, for example to be able to reset a system back to before some software was installed, configured or upgraded. In QEMU this is typically done using the qcow2 disk format, which trivially supports layers using the concept of a “backing file.” I haven’t yet looked into the disk format that’s used by the Virtualization framework, however because this system does use VirtIO-based storage devices, it seems like potentially it’s possible to achieve the same thing. Or alternatively, at a higher level, to leverage APFS’s notion of copy-on-write clones of files on the host to create thin copies of a source image with modifications, and alter the VM machine’s configuration to point to the desired source disk image of the boot volume.
Networking
VMware for a long time has supported NAT and bridged networking modes in its own hypervisor. However, in moving to Big Sur and the virtualization engine changes described above, the networking stack also needed to change.
Since Big Sur, I had to mostly abandon using VMware Fusion for macOS guests for any scenario in which I needed NAT, because this no longer worked for me. At least, until today, in their 12.2.0 release, which arrives less than a month before Big Sur’s release anniversary.
While the macOS VMs I have configured in these experiments on Apple Silicon do seem to use NAT networking by default, it seems like the Virtualization framework supports both NAT and bridged configurations.
Automation possibilities within the VM
Since my interest in macOS VMs is primarily for disposible build and test environments, I’m also interested in how easy they are to build automatically. This makes it easy to keep them up to date and to maintain a library of build/test environments to support multiple versions of macOS or Xcode, or other tools that may have particular constraints on the system version. This VM-building automation has been possible with macOS VMs using VMware, QEMU/KVM, Parallels and VirtualBox. It’s unclear to me how much of this is possible today with these new macOS guests on Apple Silicon, so I thought to go through a few features that we depend to be able to bootstrap these VMs on Intel-based platforms.
Automation within the OS installer or recovery environment
Previously, to automate creating macOS VMs we would make use of features avaiable in the macOS recovery environment (where we typically interact with the Install Assistant application) to set up a macOS installation from scratch, but with additional post-install packages specified so that we can configure some basics such as a default user, SSH, and passwordless sudo. This would allow a higher-level builder tool like Packer to then manage provisioning and archiving an image of the virtual machine. Blake Garner’s packer-macOS-11 project is the most recently-maintained repo I’ve seen that works to put this all together for a macOS VM. Many years ago, I found I was able to leverage capabilities of NetRestore in the osx-vm-templates repo, but this now feels like a relic ever since Netboot has aged out.
It’s not yet obvious to me how one might do this type of bootstrapping workflow in these new macOS VMs, except either via (1) ADE (DEP) MDM enrolment of the VM and leveraging Auto Advance and additional configuration packages (which would require at least the ability to assign a specific serial number), or (2) booting the VM to an alternate OS environment where startosinstall could be invoked at the command-line and provided additional packages. The latter would be very similar to what is possible today with (e.g.) VMware.
Both of these seem potentially possible, though not ideal ergonomically. For the latter, Apple’s publicly documented in this WWDC Tech Talk that “running startosinstall from the recovery environment is not recommended going forward and is not supported on Mac computers with Apple silicon.” Perhaps the existing APIs and platform capability already could allow doing this kind of automated provisioning, or radars could be filed to request these additional features.
Access to IP address / DHCP lease info
Another important automation capability is to be able to programatically determine a VM’s assigned IP address. This tells the provisioning tool (i.e. Packer) how it may reach the VM from the outside, in order to perform further setup. I didn’t spend time looking into this further, and while I didn’t notice an API for this specific functionality I imagine it should be possible to query the host configuration somewhere (e.g. routing or ARP tables) to look this up.
VNC connectivity
We’d also like to be able to programatically interact with it using a virtual keyboard/mouse to be able to initialize the OS setup from the install/recovery environment, and this is typically all done over VNC.
VNC then also allows exposing a virtual display that can be accessed via any client, and using SSH tunneling if the client is remote. Having both the keyboard/mouse and display possible over VNC also makes it much more practical to access it from the outside, since debugging in macOS frequently requires regular “console” access to the user’s login session: there’s much that cannot be done purely over SSH.
The Virtualization framework may contain already VNC server functionality, and I’m not sure if this is something that’s exposed publicly via any undocumented APIs.
Footnotes
There were some other notes I took during this early experimentation that didn’t really fit anywhere else but I felt were worth mentioning here.
Automatically create new Parallels VMs
It’s possible to get some more details about what CLI parameters are being called when Parallels creates the VM by just looking at ps output while the VM setup is taking place. But, one handy way I found to quickly automate creating multiple VMs was to invoke the prl_macvm_create with a pre-downloaded source .ipsw and desired target VM directory, and passing the --disksize flag to give the desired size of the newly-created disk in bytes:
# creating a 60GB disk
$ '/Applications/Parallels Desktop.app/Contents/MacOS/prl_macvm_create' \
     ~/Downloads/UniversalMac_12.0_21A5543b_Restore.ipsw \
     ~/Parallels/macvm-test-auto.macvm --disksize 60000000000
Starting installation.
Installation progress: 6.00
Installation progress: 8.00
Installation progress: 9.00

[etc]
Reminder from earlier that it didn’t seem like this CLI tool takes parameters for configuring the CPU-core-count and RAM values.
QEMU drivers in macOS
If you follow virtualization-related news surrounding macOS guests you may have heard that ever since macOS 10.14 Mojave, Apple began adding QEMU guest VM drivers to macOS, such as VirtIO-based network and storage, some basic Bochs/Cirrus VGA drivers and P9-based file sharing. I was never aware of any (large) customer or publicly-known product that depended on them, although they did work as advertised if you were using QEMU to run a macOS VM. I am guessing that with Xcode Cloud currently running macOS VMs on X86-based QEMU/KVM installations, this was at least one of the big reasons for integrating this guest support as a standard component of the OS.
Memory usage in the VM
It will be interesting to see how well the VM is able to share its memory with the host OS. One construct is that the VirtIO memory balloon device can potentially allow the guest to release memory that it’s not actively needing, back to the host OS (which could then in turn be provided to another VM that needs it). The documentation for the VZVirtioTraditionalMemoryBalloonDevice class has a few details here.